|
|
Post by artificer on Sept 29, 2020 19:18:31 GMT -7
Folks,
Sicilianhunter's recent three threads on pouches he made have inspired me to write this thread.
There are a number of written sources on the subject of making 18th century leather goods, though most don't seem to contain the fine points that distinguish that period's leather working. Add to that, there are not that many extant examples of 18th century pouches, from which to draw design techniques they used in the 18th century. It is not just a point of making a reproduction more authentic to the period, but also at times things they did that made the items wear and last longer.
Please understand I mean to showcase some of my own earlier mistakes, to hopefully save others from doing the same AND in other cases to show not only what they did, but also why they did it. The latter is extremely important to the first thing I will bring up and that is attaching straps to a pouch and stitching to attach a buckle to a belt strip of leather. BTW, I want to acknowledge and thank Sicilianhunter for allowing me to use one of the images of the back of his pouch to illustrate both a problem, but also something good. Oh, I do want to mention I made similar mistakes decades before "SH" stitched the strap to his more recent pouch.
The basic mistake I refer to is too many lines of stitches that go across the width of the strap. There is nothing wrong with the line of stitches across the width of the very end of the strap, because all that does is anchor the end of the strap and there is almost no stress on those stitches. Where I commonly made a mistake was to sew a rectangle of stitches up the strap and across the width of the strap, where the stress really works on the strap and those stitches across the strap actually weaken the strap and will eventually cause the strap to crack there. OK, let's see if I copied/pasted the image correctly or not. Grin.
i.ibb.co/3hZKjV3/CDE0-AF87-21-FC-4559-B878-3-A49-ED92-A39-E.jpg
What they did during the period was run a line of stitches parallel to the sides of the strap, one on each side for straps, that would not support much weight. They would add a third line of stitches parallel to the sides of the strap and in the center of the strap, if the strap was to normally support more weight or be more stressed. Waist belts often had this third line of stitches near the buckle. On really heavy used harness, they may have used four parallel lines of stitches running parallel to the sides of the strap. But in NONE of these uses, did they ever run a line across the width of the strap, because they knew it weakened the strap.
Now some folks may say, "Well, I've had a pouch for years with stitches going across the strap and had no problem." If the pouch doesn't carry much weight and is only used a few times a year, sure, the strap won't be affected as much as it was in the period when the pouch was used more often. (Something similar is we get years of use out of repro shoes, because we don't wear them that often, yet shoes made in the period when used heavily only lasted 1 to 3 months in the military during the day.)
To be honest, I first discovered that making a rectangle of stitches near a waist belt buckle would cause the leather to crack was when I was doing a lot of AWI reenacting. After only 2 1/2 years, I was shocked my waist belt cracked through the stitches going across the strap. This even though I had oiled the belt when needed to keep it supple. That led me to investigate a couple pouches I had made years earlier and sure enough, I found evidence the straps were weakened by stitching across the width of the strap.
So I learned WHY they didn't stitch across the strap during the period, because they knew it would weaken the strap or belt during use.
OK, so I don't forget, there is something I recently learned about attaching period buckles to straps or belts that goes along with the stitching only being parallel to the sides of the strap and it is sort of illustrated in the pic above. The two lines of stitches they ran parallel to and close to each side, when they got to the stitch closest to the buckle, they went around the outer edges of the strap a couple of times to help enclose the strap as it went over the center portion of the buckle. I can see how that would help keep the buckle in place, better.
Gus
|
|
|
|
Post by hawkeyes on Sept 30, 2020 4:55:00 GMT -7
Good post, understanding simple mechanical principles and load bearing capabilities indeed goes into play when constructing reproduction pieces for actual use. I myself have learned those lessons from trial, error and research.
|
|
|
|
Post by artificer on Sept 30, 2020 6:41:04 GMT -7
Good post, understanding simple mechanical principles and load bearing capabilities indeed goes into play when constructing reproduction pieces for actual use. I myself have learned those lessons from trial, error and research.
The waist belt I had that cracked through the stitches was made from fairly thick leather, about 5 - 7 oz. That thickness was as thick, if not thicker than the leather used in the 18th century for the same purpose, so it really surprised me when it cracked through the stitches. However, I was using that waist belt to really cinch down/tighten a "belly box" as it is called today or a "Cartouche Box" in the period and keeping it tight enough to my belly that it would not turn forward and down when worn. I believe that additional stress caused the stitches across the width of the belt to crack through the leather even faster had I not generally put that much pressure on a waist belt. I was "out" a good belt blank, but I think it was a cheap lesson to learn.
Gus |
|
|
|
Post by artificer on Sept 30, 2020 7:02:40 GMT -7
I was looking on the web for pics of original pouch straps or waist belts that would show stitches only along the length of the belt. Didn't have any luck at this time, but hopefully I will run across some later and can add it to this thread. I did find this pic of two types of repro waist belts with proper 18th century stitching, so decided to add this as an illustration:
static.wixstatic.com/media/0b5e7a_8b678d680f584a4d903b847e74129ccf.jpg/v1/fill/w_611,h_437,al_c,q_80,usm_0.66_1.00_0.01/0b5e7a_8b678d680f584a4d903b847e74129ccf.webp
Gus
|
|
|
|
Post by spence on Sept 30, 2020 8:49:09 GMT -7
The link won't work for me. To attach straps to bags I've always used two lines parallel and one across at the tip only. And I angle the attachment to align with the direction of the pull when the bag is worn.  For buckles, two parallel lines only. 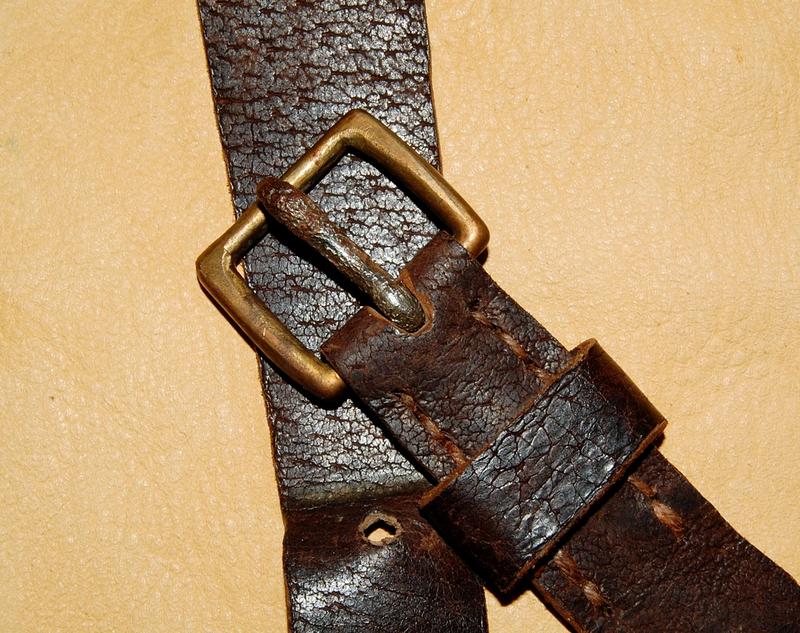 Spence |
|
|
|
Post by Sicilianhunter on Sept 30, 2020 11:28:47 GMT -7
Gus,
Thanks for all of the information and tips!!
I will be sure to incorporate what I learned in my future undertakings.
|
|
|
|
Post by artificer on Sept 30, 2020 14:38:52 GMT -7
The link won't work for me. To attach straps to bags I've always used two lines parallel and one across at the tip only. And I angle the attachment to align with the direction of the pull when the bag is worn. For buckles, two parallel lines only. Spence
Thank you for those excellent pics. Yes indeed, the "U" shaped stitching you used on the pouch straps and the two lines of stitching along the length of the strap for the buckle, is the correct way for the 18th century and into the early 19th century as well. Really appreciate you posting those pics.
Gus |
|
|
|
Post by artificer on Oct 5, 2020 17:43:34 GMT -7
As to staining or dyeing the leather in the 18th century, it was much, MUCH more common that they only stained/dyed the smooth side of the leather and left the rest undyed/unstained. Actually the "best English leathers" could be imported already dyed/stained this way, though it was also imported undyed/unstained. Also, when they cut pieces of undyed/unstained hides to make things and the customer or they wanted to dye/stain it, they dyed/stained the pieces BEFORE they sewed them up. They usually wet the leather before dying/staining so all the pieces could more easily be dyed/stained to match, rather than some pieces would naturally soak up more dye/stain than others, had they not wet the leather first.
Further, after they got the pieces dyed/stained to match, it was more likely they wet the leather again and before they sewed up the pieces, they did an initial oil treatment on the rough side of the leather. Wetting the leather first, means you are less likely to have TOO much oil soak into the rough side of the leather.
On what they called "stufft" or "stuff'd" leather, the hide was dyed/stained on the smooth side and then the rough side had oils and waxes "stuffed" into it or worked into it, as we would say. We know this as "Oil Tanned Vegetable Leather" today. BTW, if you want to use "Oil Tanned" leather, choose the color you want when you buy the leather, because it is almost impossible to dye/stain it after the oiling process is done.
Now, I have not been able to document why they usually only dyed/stained the smooth side of the leather. There were some cases where they "vat dyed" entire hides, which meant the dye/stain got sucked into the rough side of the leather as well, but "vat dyeing" was not nearly as common. My guess is they only dyed/stained the smooth side of the leather in most cases for two reasons.
I think the most important reason they only dyed/stained the smooth side of the leather was because it allowed initial and subsequent oiling of the leather, when needed, to absorb more easily into the rough side of the leather. Some dyes/stains did and can interfere with that when the dye is used on all sides of the leather. I can confirm with modern dyes/stains, that it will interfere when you want to do "maintenance" oiling of your leather goods
I also suspect they chose not to "vat dye" most hides as it was a waste of money, I.E. the inside of pouches, bags, etc. were not openly seen and thus no need to spend the money. This was "18th century thinking" that was evident in many trades. For example, you only used the fancy material on the front of a waist coat, as the back material of the waist coat was normally covered by the outer coat and not normally seen. In the furniture trades and even in the highest grades; back boards that were not seen, were left very rough with scrub plane marks and even sometimes hand saw marks on them. Today that would send a modern fine furniture maker off the deep end, but they thought it only made sense not to waste labor/money on something that would not be seen as it faced a wall.
As to linen or other thread they used to sew up leather items, the "standard" was undyed thread, though there were dyed threads available and of course the leather worker could have dyed the thread before he waxed it and used it to sew up the pieces.
Gus
|
|
|
|
Post by paranger on Oct 5, 2020 17:57:15 GMT -7
Great post, Gus.
I have been experimenting with period leather dying (for sheaths mostly - smooth side only, as you say) using logwood, vinegroon, walnut, etc. I have been tickled with how well the period dyes and mordants work! No reason to entertain the use of modern dyes, IMO.
|
|
|
|
Post by artificer on Oct 5, 2020 18:57:02 GMT -7
Great post, Gus. I have been experimenting with period leather dying (for sheaths mostly - smooth side only, as you say) using logwood, vinegroon, walnut, etc. I have been tickled with how well the period dyes and mordants work! No reason to entertain the use of modern dyes, IMO.
I have used vinegaroon a couple times so far, but have never used other period dyes/stains. I have used a lot of modern leather dyes as "spirit dyes" were well known in the 18th century. Spirit dyes means the coloring agent is mixed or borne into solution by alcohol, though I have never been able to document what other differences there may have been in period spirit stains and modern spirit stains.
However, if you care too, I would love for you to add information on using period dyes and mordants and especially what you have learned in how to do it. I know I would enjoy it very much and I think others would as well.
Gus |
|
|
|
Post by paranger on Oct 6, 2020 3:21:57 GMT -7
Great post, Gus. I have been experimenting with period leather dying (for sheaths mostly - smooth side only, as you say) using logwood, vinegroon, walnut, etc. I have been tickled with how well the period dyes and mordants work! No reason to entertain the use of modern dyes, IMO.
I have used vinegaroon a couple times so far, but have never used other period dyes/stains. I have used a lot of modern leather dyes as "spirit dyes" were well known in the 18th century. Spirit dyes means the coloring agent is mixed or borne into solution by alcohol, though I have never been able to document what other differences there may have been in period spirit stains and modern spirit stains.
However, if you care too, I would love for you to add information on using period dyes and mordants and especially what you have learned in how to do it. I know I would enjoy it very much and I think others would as well.
GusSure, Gus. I will see if I can put together some lessons and observations. |
|
|
|
Post by bertovek on Oct 19, 2020 9:52:37 GMT -7
I have been leatherworking for a couple of years and during this time I realized that the fastener for the bags must be strong. I also love stamping, which is an important process in almost any leather project. The embossing gives the leather originality. For a good embossing, only two things are needed: an imprint and a special hammer. A good sledgehammer should also have a thing for making precise small holes in a leather belt or skin. Craft hammers are different from standard household tools. It is also an object striking device, more details here leather-toolkits.com/reviews/best-hammers-for-leather/ . But unlike a conventional hammer, a craft tool is usually less heavy and more comfortable to use when working. |
|
|
|
Post by hawkeyes on Oct 19, 2020 13:43:37 GMT -7
I believe for the common woodsman, myself included special tooling for top notch reproductions of leather goods certainly isn't necessary and I'll argue that. If one has an understanding of how to work leather with common items that were documented and available to our ancestors amazing accoutrements can be fashioned. I see all to often over analyzing and the over complication of tasks that should be committed to memory lead to frustration and sometimes burnout.
If one has a good sharp awl, a selection of needles, water and mallet of sorts from a hardwood or hammer poll hawk you indeed are set. I've made countless bags, pouches, leggings and other leather goods with absolutely zero modern tooling for years that have outfitted many. The acronym KISS applies to many areas of our hobby, this is one.
|
|
|
|
Post by artificer on Oct 20, 2020 14:05:41 GMT -7
As to stamping and "decorations" on 18th century leather goods, there was a mixed bag that even a frontiersman would have seen.
Trade Knife sheaths came plain, but some also came with crossed lines. These were done with a "Creaser" that was slightly warmed over an alcohol or other lamp. When I say "slightly warmed," I mean only a few seconds in the flames and just warm to the touch. These were used after the leather was dyed and wet down. This Creaser style is 19th century, but it gives you an idea of the metal working edge.
www.weaverleathersupply.com/catalog/item-detail/67-5100/single-edge-creaser/pr_59972/cp_/shop-now/hand-tools/edge-bevelers
Impressed rounded dots would normally not have been used, except by saddlers and some other leather trades. This is not to say a frontiersman could not have done it with a rounded nail, though if he wished.
There were also SOME period stamping tools, though usually only done by period leather workers. I would not expect to see them on a frontiersman's pouch unless his pouch was made by a period leather worker. However, I suggest one find documentation on the stamps they actually used, because a huge number of modern stamps would not be correct for the 18th century.
Compasses were very common tools and would even have been common on the frontier for a multitude of trades. They used these to measure/mark straps of all sorts. They also used them with one slightly blunted end when the leather was wet to crease a line for stitches, so the stitches would be below the surface of the leather and thus not be as exposed to abrasion or wear. Today we use a tool that makes a groove along the edge of the leather for these stitches, but I can't document that tool to the 18th century.
Not everyone on the frontier did saddle stitching, as some original early 19th century pouches have been found with crude whip or other stitching. (There are not enough 18th century documented pouches that survived to make a general statement, but a frontiersman in a hurry might or probably did the same thing in the 18th century.) However, most frontiersmen would have seen saddle stitching done on horse or oxen tack. If they weren't a trained leather worker, their saddle stitches might not have been as exact or esthetically pleasing, but it would have gotten the job done.
One can never go wrong with a pretty plain pouch or other leather articles for frontiersmen. However, as some got older, they could afford something a bit more fancy. Of course some more affluent folks showed up on the frontier as surveyors or other trades, their leather gear sometimes to often was made by period leather workers and could/would have thus been more "fancy."
My personal taste is in properly made leather items where the quality of the leather, craftsmanship, assembly and stitching stands out; but with no added decoration than maybe some lines along the edges of some straps. However, that is just my own personal taste and I'm not trying to suggest that is the main or only way to do it.
Gus
|
|


