|
|
Post by Black Hand on Sept 18, 2019 17:32:51 GMT -7
That is a nice tool chest. Is it yours or is there a link to the original post? |
|
|
|
Post by artificer on Sept 19, 2019 0:36:52 GMT -7
Keith, In the mid 1970's through the late 1990's, I was fortunate to live in or near Fredericksburg, VA with an amazing number of antique stores carrying original 18th century boxes and chests of all sorts. I sought those pieces out to study, as I was interested in making some chests for reenacting and to hopefully make my own reproduction 18th century Artificer's Tool Chest. As you probably know, leather hinges were very common on shipping boxes (when they didn't just nail the lids down) and on more common/less expensive boxes and chests. So using leather hinges for repro chests for many of us, is perfectly period correct as are the rope handles. What may not be as common of knowledge is that "Snipe Hinges" were also quite common from the late 17th through much of the 18th century as well. These were used on small document chests up to rather large chests with only the size of the hinges being different. These hinges are great to use on repro 18th century camp and storage boxes. I hope this link works as it is a pretty good tutorial on making and installing these hinges. The only criticism I have is that after he drove one half of the hinge into the wood and went to separate and bend the two pieces, he only bent the very ends down before driving each piece into the wood to "clinch" them. Commonly they bent the ends more into a half circle before hammering down or clinching each end. www.youtube.com/watch?v=RPUzkSghqhgGus |
|
Keith
City-dweller
 Bushfire close but safe now. Getting some good rain.
Posts: 990 
|
Post by Keith on Sept 19, 2019 1:27:27 GMT -7
Keith, In the mid 1970's through the late 1990's, I was fortunate to live in or near Fredericksburg, VA with an amazing number of antique stores carrying original 18th century boxes and chests of all sorts. I sought those pieces out to study, as I was interested in making some chests for reenacting and to hopefully make my own reproduction 18th century Artificer's Tool Chest. As you probably know, leather hinges were very common on shipping boxes (when they didn't just nail the lids down) and on more common/less expensive boxes and chests. So using leather hinges for repro chests for many of us, is perfectly period correct as are the rope handles. What may not be as common of knowledge is that "Snipe Hinges" were also quite common from the late 17th through much of the 18th century as well. These were used on small document chests up to rather large chests with only the size of the hinges being different. These hinges are great to use on repro 18th century camp and storage boxes. I hope this link works as it is a pretty good tutorial on making and installing these hinges. The only criticism I have is that after he drove one half of the hinge into the wood and went to separate and bend the two pieces, he only bent the very ends down before driving each piece into the wood to "clinch" them. Commonly they bent the ends more into a half circle before hammering down or clinching each end. www.youtube.com/watch?v=RPUzkSghqhgGus Thank you for that Gus, I did know about the snipe hinges, I have seen them on some antique chests, but I had forgotten what they were called! Thanks for the video too mate, I shall pass this on. Regards, Keith. |
|
|
|
Post by artificer on Sept 19, 2019 6:18:51 GMT -7
You are most welcome, Keith.
Blackhand,
The tool box you asked about is not mine. I got that picture from Pininterest, but since I don't have an account, I can't pass on a link.
I've been planning on making an HC/PC Tool Chest for my Artificer's Tools since I retired from the military, but have just not gotten to it, yet. Took me a while to collect original 18th and some 19th century tools (that were 18th century style) for the Artificer's Tool kit. I also made some repro tools and finding other modern ones that are period correct as can be (like files for example).
What I found along the way is, it is probably best one have the tools before trying to make an HCPC chest for them. I gave up on a couple of tool chest designs as well, after getting some of the tools. I have my Great Grandfather's circa 1880 Carpenter Tool Chest made of solid wood and his Son's (my Grandfather's) Tool Chest that he made from Plywood. So I also have an idea of how big I can go with an Artificer's Chest and not make it too big to take to reenactments and living histories.
If you have other questions on 18th century Wood Tool Chests, please ask, because I learned quite a lot along the way and would be happy to pass on the information.
Gus
|
|
|
|
Post by spence on Sept 19, 2019 8:37:00 GMT -7
|
|
|
|
Post by Black Hand on Sept 19, 2019 9:04:27 GMT -7
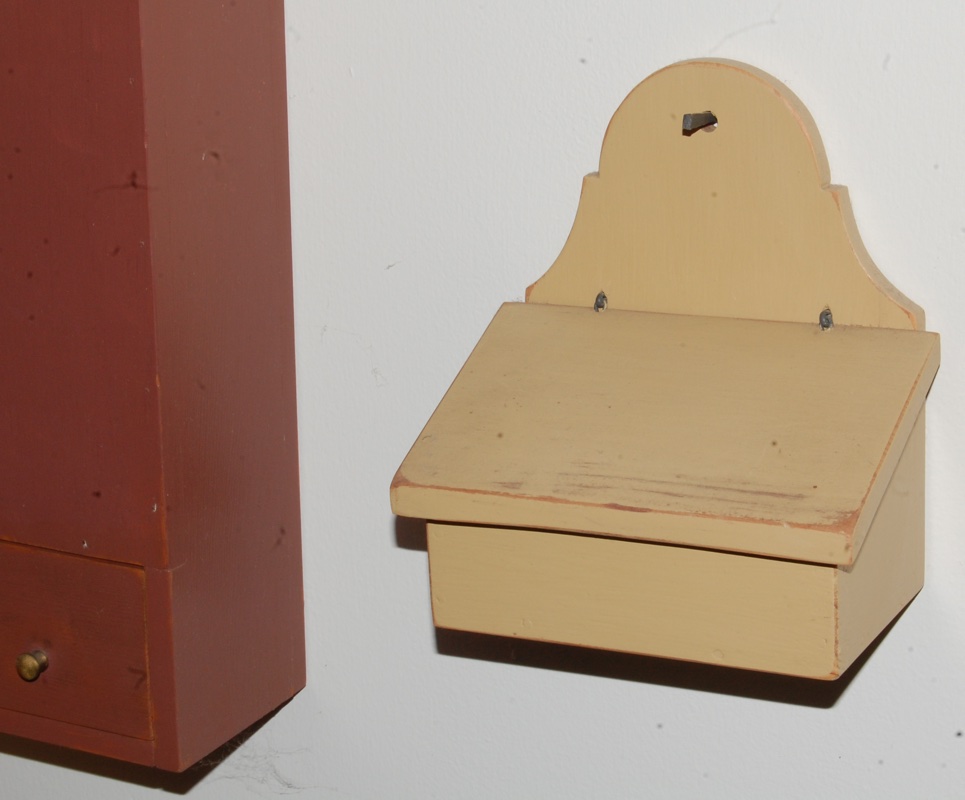
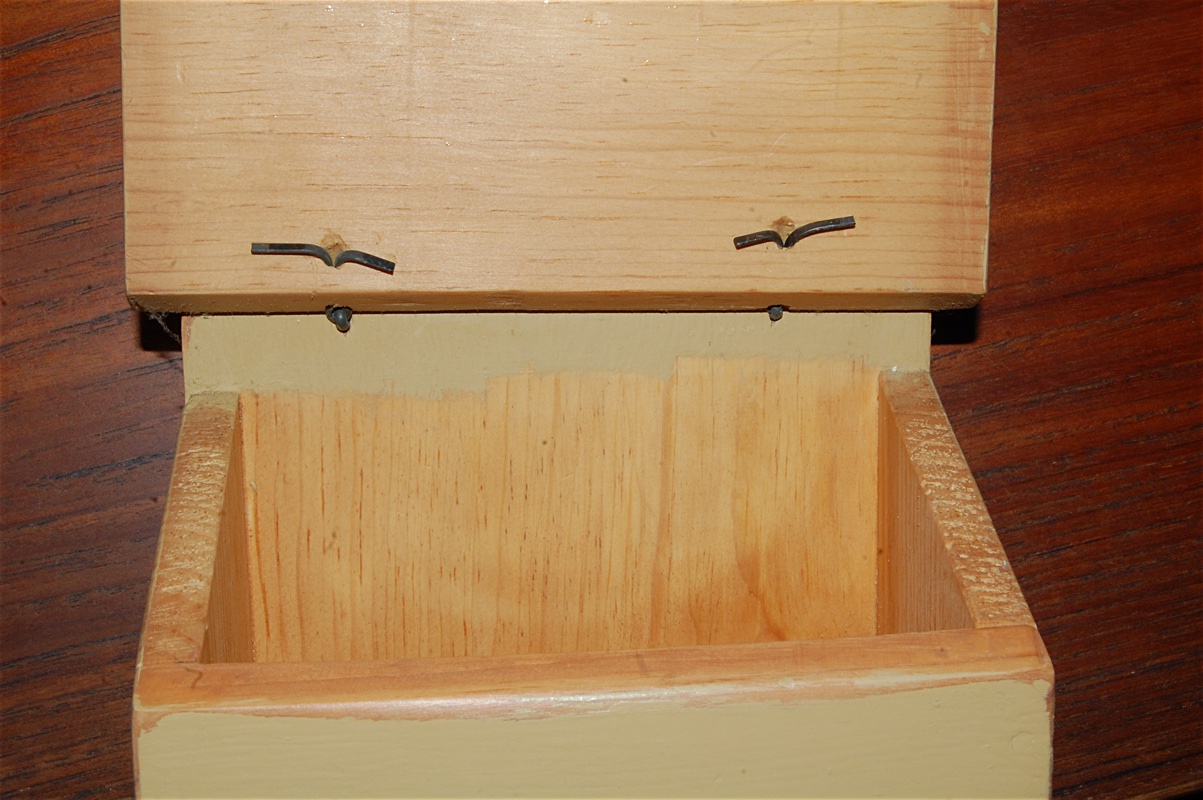
What may not be as common of knowledge is that "Snipe Hinges" were also quite common from the late 17th through much of the 18th century as well. These were used on small document chests up to rather large chests with only the size of the hinges being different. These hinges are great to use on repro 18th century camp and storage boxes. I hope this link works as it is a pretty good tutorial on making and installing these hinges. The only criticism I have is that after he drove one half of the hinge into the wood and went to separate and bend the two pieces, he only bent the very ends down before driving each piece into the wood to "clinch" them. Commonly they bent the ends more into a half circle before hammering down or clinching each end. On the yellow box I've shown elsewhere I have Snipe hinges (made from Cotter pins). If you don't have steel rod, the multipack of Cotter pins from Harbor Freight will provide enough to make many... |
|
|
|
Post by Black Hand on Sept 19, 2019 9:06:58 GMT -7
If you have other questions on 18th century Wood Tool Chests, please ask, because I learned quite a lot along the way and would be happy to pass on the information. Gus Anything you'd be willing to post would be most welcome. I don't have any 18/19th century tools (except for a hand-vise) to even think about making one, but this will change some day. |
|
Keith
City-dweller
Bushfire close but safe now. Getting some good rain.
Posts: 990
|
Post by Keith on Sept 19, 2019 15:22:30 GMT -7
I used snipe hinges on a small wall-hanging salt box many years ago. Didn't know they were called that. I didn't clinch the pins. Spence I love it Spence, well done mate. Keith. |
|
|
|
Post by artificer on Sept 20, 2019 1:54:15 GMT -7
Spence,
Thanks for showing the pictures of the salt box. It reminded me of something I noticed in the YouTube link on making using Snipe Hinges, but might otherwise not have mentioned. .
To all,
In that video, did you notice that after drilling the hole, the guy had to drive each half of the snipe hinge into the wood as the eye got close to the surface of the wood? There was a good reason for that, once explained by the Master Joiner of "Plimouth Pantation" (in MA) on The Woodwright's Shop. I will be paraphrasing for the gist of what he said.
The idea of boring/drilling a hole a little on the small side for the legs of each half of the Snipe Hinge was it kept the eye in the correct position both as one clenched the ends and to ensure the eye would remain in that position longer, so the Snipe hinges worked properly for a longer period before the force of continued use of the hinge caused the wood to be worn around it and loosen it. IOW, you don't want to drill the hole so large that the eye easily twists when you are attempting to clench it or in use for a long time afterwards. When you look at original boxes with snipe hinges enough, you will see some that remain working properly and others where the eye has twisted out of position, because the hole has worn larger..
One thing the guy did not do, that some offer as a tip, is to put a rod or pin punch into the eye that fits it as closely as possible. Then as you drive/hit the eye when you drive each half of the snipe hinge, it won't deform the eye out of round and will help keep the eye in the correct position.
Not sure how many people know this, so I thought it would be good to point that out while I'm thinking about it.
Gus
.
|
|
Keith
City-dweller
Bushfire close but safe now. Getting some good rain.
Posts: 990
|
Post by Keith on Sept 20, 2019 2:22:54 GMT -7
Spence, Thanks for showing the pictures of the salt box. It reminded me of something I noticed in the YouTube link on making using Snipe Hinges, but might otherwise not have mentioned. . To all, In that video, did you notice that after drilling the hole, the guy had to drive each half of the snipe hinge into the wood as the eye got close to the surface of the wood? There was a good reason for that, once explained by the Master Joiner of "Plimouth Pantation" (in MA) on The Woodwright's Shop. I will be paraphrasing for the gist of what he said. The idea of boring/drilling a hole a little on the small side for the legs of each half of the Snipe Hinge was it kept the eye in the correct position both as one clenched the ends and to ensure the eye would remain in that position longer, so the Snipe hinges worked properly for a longer period before the force of continued use of the hinge caused the wood to be worn around it and loosen it. IOW, you don't want to drill the hole so large that the eye easily twists when you are attempting to clench it or in use for a long time afterwards. When you look at original boxes with snipe hinges enough, you will see some that remain working properly and others where the eye has twisted out of position, because the hole has worn larger.. One thing the guy did not do, that some offer as a tip, is to put a rod or pin punch into the eye that fits it as closely as possible. Then as you drive/hit the eye when you drive each half of the snipe hinge, it won't deform the eye out of round and will help keep the eye in the correct position. Not sure how many people know this, so I thought it would be good to point that out while I'm thinking about it. Gus . Good one Gus, thank you. Keith. |
|
|
|
Post by artificer on Sept 20, 2019 8:15:33 GMT -7
In my post above, I should also have mentioned that when they clenched the legs of each half of the Snipe Hinges, trying to keep the eyes in the same position, is why they bent each leg more into a half round shape before driving each end into the wood. That meant they got more of each leg clenched/bent into the wood and that provided more resistance to twisting or coming loose. OK, this post is inspired by Blackhand earlier mentioning using Cotter Pins as Snipe Hinges, though the Snipe Hinges made from Cotter Pins look a bit different than had a round rod/wire been used, as in the link to the YouTube Video. Folks, there was not just one way Snipe Hinges were made and using Cotter Pins makes a very good reproduction of another kind of period Snipe Hinge, it all depended on what shape of Iron the maker had on hand to make the Snipe Hinges and what tools he had to make them. I was delighted to find the following link that shows a "hardy" or form that some blacksmiths used to make the eyes round in diameter by hammering the heated Iron into the half round Hardy's/Forms. If you look close, you can see the rings around the eyes left by the Iron not being completely driven into the half round Hardy/Form and the excess material forms that ring. Even more important, the legs of each Snipe Hinge are half rounded like a Cotter Pin, though they are tapered down the further from the eye in this link. If a person/s wanted to, they could taper the legs of a Cotter Pin with a hand file, belt or disc sander, or grinder to look like this. Or if they could heat the legs of a Cotter Pin and "Upset" or hammer out the legs so they are tapered like this. www.cloverdaleforge.com/forged-up-new-hardy-tooling-to-help-make-snipe-hinges-asker-to-forge-pretty-happy-with-the-results-blacksmith-forged-madeincanada-hinge-steel/The following link looks something like still another way Snipe Hinges may have been made. In this case, if the Blacksmith had only square nail stock on hand, he could have heated the center of each half of the Snipe Hinge, forged the center section round by hammering and then heated the legs and flattened them out. www.horton-brasses.com/snipehinges.asp Oh, before I forget I wanted to mention in the 18th century, they often used "clenching," as is done with ends of the Snipe Hinges, when they wanted to make a Square Nail joint more secure. If it was possible to clench a nail, they usually did it in wood. I will bring this up again for some parts of boxes and tool boxes. The reason this was necessary was because they had to drill a hole for each and every Square Nail they used, as otherwise a Square Nail often/usually would crack the wood, if they did not. They did not have the range of drill bit sizes we have, so this kept the Square Nail from coming loose in the hole in the wood. Gus |
|
|
|
Post by artificer on Sept 20, 2019 8:57:51 GMT -7
This post will address something often used on the bottoms of 18th Century Tool Chests and some other chests, that some folks may want to consider using on or adding to their Camp Boxes and especially if the Camp Boxes rest on the grass or ground at their camps. I'm referring to "sacrificial boards" that were nailed onto the bottoms of Tool and some other chests to keep the bottoms of the boxes off a hard packed, bare earthen floor in some cabins or off the grass/ground when transporting the boxes. They were concerned about moisture coming up through a bare earthen floor or off dew covered grass or wet ground, any of which would rot the bottoms of boxes. So they nailed "sacrificial boards" to the bottoms that would occasionally be replaced when needed, but still protect the rest of the box from moisture rotting. Though this was the main reason they nailed these sacrificial boards on the boxes/chests, it also made it easier to get one's hands under the box to move it or pick it up. Here's a link showing an 18th century Chest that still has two of these sacrificial boards in place, near the ends of each side of the box. (On really heavy/large boxes, they used three or even four such sacrificial boards, to better support the bottoms of the boxes.) cf.collectorsweekly.com/stories/xd4HLTGFcwOdovMUOe-TEg.jpg. Now, these sacrificial boards on original 18th Century Tool Chests and some other boxes and chests are often missing today. Most likely because some to many were in bad shape and some more modern users or sellers just tore the sacrificial boards off the bottoms. Since I looked at the bottoms of original Tool Chests, when I examined them for construction details and before I knew about the sacrificial boards, I often wondered why you could see old nails holes in the bottoms? It just didn't make sense until I learned about the sacrificial boards. Anyway, just wanted to offer something from original construction, that some folks may find appealing on their modern repro boxes. Gus |
|
|
|
Post by artificer on Sept 22, 2019 17:30:00 GMT -7
In most of the 18th century, boxes and chests of many sorts were made by "six board" construction. That means a single board each for the front, back, sides, top and bottom. Though there are examples of chests being made with each one of these six pieces being two boards, normally they used a single board for each piece. The reason for that was lumber was pit sawed and every time they ripped down the width of boards along the length, it took that much more hand sawing and that meant more cost. Also, it was easier to dovetail or nail up single boards to form the box, rather than having to join smaller width boards for each piece. Of course today we are lucky to find boards even 16 inches wide, let alone much wider. Wider boards can be found today, but they normally have to be shipped from the Northeast or there has to be a local sawmill who will saw boards that way for you. Even if you can get a sawmill to do that for you, you are most likely going to have to hand plane the boards to smooth them, as many modern planning machines won't work for boards 16 inches or wider. Bottom line, it often is more expensive today to find boards large enough for some boxes/chests. When they used a single board for the lid of the box, it wasn't a problem when the lid was nailed down. However, when the lid was free to open and shut on the box, then the lid could twist or warp. The Photo below shows an example of this and also shows how a single board for a lid could crack along the length: img0.etsystatic.com/183/0/13564006/il_340x270.1216708564_g9v9.jpgSince they knew the lids would often warp/twist with the climate changes, especially if they didn't have enough time to full air dry the boards, one of the earlier things they did to combat this was to make the lids longer and wider than the top of the box. Modern boards are normally kiln dried, so they won't warp or twist as much, unless they are normally open to the elements. They also sometimes nailed smaller boards on each end and under the lid to stop the lids from twisting and to keep the lid covering the box. Blackhand's Chest for a Lady, shown at the beginning of the thread, is a good example of that. In the first half of the 18th century or so, primitive or less expensive boxes made with dovetails were often/usually made with fairly large dovetails, as the dovetails were cut with chisels and mallets. So if one is making camp boxes or boxes that would have been assembled on the frontier in that period, no need for tiny/intricate dovetails. It was only after Benjamin Huntsman developed Crucible/Cast Steel around Mid 18th century, that made hand and dovetail saws less expensive, that the dovetails got smaller/more intricate more commonly and on plainer boxes. An additional thing was done for boxes that would hold heavier objects and that was to put a "band" of boards around the bottom of a dovetailed box. The band boards were dovetailed in the opposite direction of the other boards of the box and that helped keep the box dovetails together. These were usually nailed as well, but mainly to keep the dovetailed band in place. Note: Unless you expect to carry heavy objects, most camp boxes won't need this band of boards. i.pinimg.com/736x/dd/03/b2/dd03b2b272f9d26576f1cf7c9301ac19.jpgMore later. Gus |
|
|
|
Post by straekat on Oct 16, 2019 4:38:55 GMT -7
The corners are butt-joined with glue and nails. Still experimenting with dovetails, but haven't succeeded to my standards so I have not used them to join boxes...yet.
Knowing how to make hand-made dovetails is a useful skill, and correctly made boxes using them instead of nailing boards together is the proper period method, and looks better. Machines speed the process up, and should not be used to learn how to make dovetails, otherwise the temptation of relying on machines will be a difficult hurdle to over-come. Once the method is mastered, someone who wants to build boxes for a group or friends, or even for sale, might be interested to know there is a simple way to use machinery to create a custom hand-made appearance that very closely recruits an 18th century look.
This method cheats and uses power tools to speed up the process of making dovetails, however, the results definitely can be done to quickly create a hand-made appearance that might be useful for a production run of storage boxes and items.
I've posted a link to this type of dovetailing, because not everyone in the hobby has or makes entirely hand-made items, and may have rifles/smooth-bores that are factory-made off the rack firearms, factory made shoes, vendor made clothing made on a sewing machine. Most of what I have is hand-made either by myself, or acquired from someone who does. Not everyone has the hand-skills to make their own items, and if you have some woodworking abilities and want to make something that looks better than a mass-produced item, this video is for you.
The youtube video is by someone who posts woodworking videos to the site, and also has a web-site that can be found by doing a web-search for "stumpy nubs". "Stumpy's" nickname comes from a reference to woodworking cuts and a joke about loosing parts of fingers while working in the shop.
|
|
|
|
Post by straekat on Oct 25, 2019 13:49:10 GMT -7
This tuned up in a local second hand store this week, and was something I couldn't pass on. (I had to smuggle it into the house...) I'll give it to the "S.O." as a surprise gift for her to use to store period clothing in at home, but not to be taken to events. This is entirely hand made, with the boards showing reciprocating saw marks in a few spots, and probably dates to the first half of the 19th century.
Size is about 15"x15"x30, with the sides, top and bottom all being single boards about 3/8" thick. It is dovetailed, with some square cut nails present. The exterior is painted a dark red/black swirl pattern. The hinges are brass, and the lock is wrought iron. There were traces of leather handles that had been nailed on the sides, although the nails or tacks were not very deeply hammered in. On the inside of the lid is a very light trace of something written in using Spencerian/copperplate script, and is too long to be a name.   |
|